Beautiful Kiddy Things...

From Me...
From Others....
Showing posts with label sewing. Show all posts

Sunday, September 5, 2010

New to Angel Face and Sunshine!

This is the latest little creation to be added to Angel Face and Sunshine.  I hope to have a variety of choices on madeit.com ASAP.  Orders are Welcome or keep an eye on this space or in store! Each set consists of a tutu, romper, 2 press- stud flowers (1 yo-yo, 1 satin), 3 hair clip flowers (2 yo-yo, 1 satin).  The hair clip flowers can be worn on the tutu, in the hair or on a fabric/elastic hairband. So many ways to wear one little outfit.

Take 1 tutu, 1 romper, 5 fabric flowers and create so many looks. It's just Toot Sweet!!!

Saturday, July 24, 2010

Little Shoes for Giselle

My cousin Sharon was one of the many people to complain about not being able to find cute little shoes for bubs under 9 months.  So...it was only fair that her little bub Giselle get some of my first little tootsy creations.  These turned out much nicer than Gracey's as I have found a more professional way to sew the panels together.  I also made Giselle a little beanie/hair clip...just to complete the ensemble.

Saturday, July 17, 2010

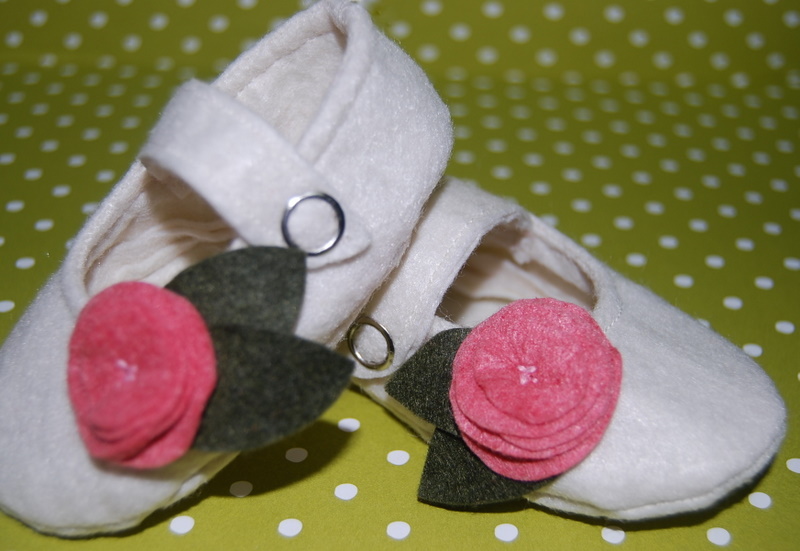
Little Mary Jane Shoes....or as I like to call these red ones...Dorothy Shoes!

So many of my friends complain about how hard it is to find small cute little girl shoes.  After some net surfing I found a pattern to make a similar pair of shoes to these and adapted the pattern to suit my tastes.  This is what I came up with:


They were really easy to make and took very little time.  All done in one night!

Thursday, July 15, 2010

Gracey's 1st Birthday Parties...


Just a very quick post to show you some of the decorative highlights of Gracey's first birthday celebrations...yes there was 2.  One for our Brisbane connection of friends and family and the other for our Maryborough friends and family. It was a busy seven days with lots of prep and baking but I got through it, with the addition of some rather large black circles under my eyes.
For G's 2 parties I stuck with a red and pink butterfly theme.  I just changed the cake idea for each.  Bettina Butterfly was so gorgeous with her 2 big eyes...she was almost too cute to cut up and eat. I also made G 2 birthday outfits.  The butterfly princess skirt and fascinator plus a little pinafore dress for party playtime.

Wednesday, June 16, 2010

Circle Roses

At the moment I'm full steam ahead into creating Gracey's Butterfly wonderland for her 1st birthday.  One of the beautiful decorations I have stumbled across are burnt satin roses, using my heat emboss tool.  They are so easy to make and end up looking like a beautiful creation you would see on a wedding dress or lush hat at the races.
Trace various sized circles on to satin lining fabric (super cheap at fabric stores).

Pin and cut out.
Secure circles from biggest to smallest with a metal brad. Using a heat embossing tool and tongs to hold your circle flower, heat until satin begins to curl up.  Continue until you achieve your chosen result. I was amazed at how easy these were to make. 

Expect to see many of these in the coming Birthday Bash pics!!

Sunday, May 9, 2010

My Gift to Mum

Over the last couple of weeks I've been making this bag for my Mum.  I can't say that I'm completely happy with the end result but I know Mum loves the fabric combinations and will get alot of use out of it.  For the next one I'm going to get a different type of wadding to hold the bag up when placed down.

To go with the bag I also whipped up a matching glasses case.  My Mum is forever losing her glasses.  So let's hope that the bright fabric makes it a little easier to spot when we are pulling the house apart on yet another glasses hunt.

Thursday, April 15, 2010

Cute T's for my little ones!

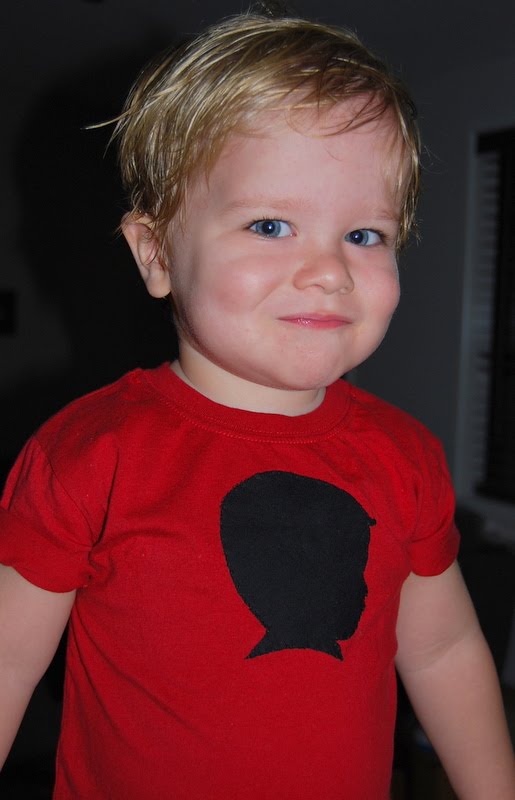
What do you get when you take 2 photos, some iron-on interfacing, black fabric and a needle and cotton? These cute silhouette shirts of the little ones!

I used these 2 photos:

Then traced around them on a black and white copy:
Then transfered this image on to iron-on interfacing (used for quilting). Then iron on the black cotton fabric.  Cut the silhouette image out. Removed the paper backing, ironed this onto the shirt or onesie. Then to finish it off, I hand stitched around the edge to make it wash safe.

This was such a quick project.  The hand stitching took the most time.  I'm going to keep these little silhouette pieces for their 21st box. Definately a lasting memory of these beautiful baby toddler years. Perhaps I might even do it every April.  It would be a beautiful way to Chronicle their changes over the years...plus they look super groovy!!!

Saturday, March 13, 2010

BIrdies for Charlie!

Here are the little Spool birdies I have made for little Charlie.  I think they are going to be just perfect little friends for her to sit on her bookcase.

Thursday, March 11, 2010

The Cutest Little Birdies

I've made these gorgeous little material birds for my little boy's new room.  The pattern can be found at Spool.

I'm planning to make a couple more to create a flying bird mobile.

They are just so adorable and my little boy just loves tucking them under his little arm for a cuddle.